Tutorial for Beginners
Preparation
Install present4D VR-Suite
Download the tutorial sample files: http://present4d.com/vrs-download/present4D-Tutorial-1.zip (40 MB)
Unzip the present4D-Tutorial-1.zip
Copy the folder
present4D-Tutorial-1to your desktop.
Project Overview
The example context is a fictional crime scene with a corpse. All available media files that can contribute to understanding the case can be easily collected and viewed in present4D.
- 360° Photo 1: Outside
1 x Slideshow: Whitness Video
1 x Slideshow: Bullet Report
- 360° Photo 2: Body
1 x Slideshow: Bullet Details
- 360° Photo 2: Blood
1 x Slideshow: Blood Details
Overview Map

360° Photos with Icon Positions


Step by Step Tutorial
We recommend printing this manual and doing the tutorial without VR Headset.
1. Create the Project
Start present4D VR-Suite
In the Project Portal click + create to setup a new Project.
Name the Project
Tutorial1_myNameConfirm with the green check mark
choose option Create a new Project
Click Start
Now you are in a small default tutorial location.
2. Import the 360° Media files
Choose Start Alone
choose the tab Locations
On the bottom row of the iMenu, there are buttons to add 360° Locations.
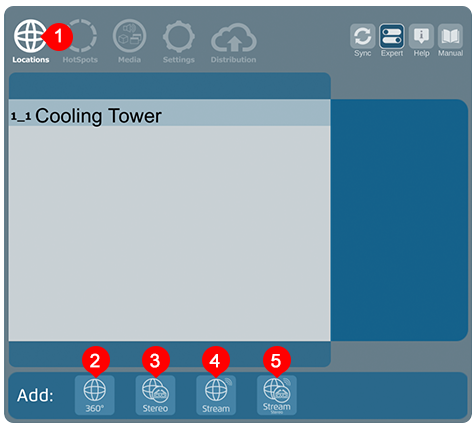
You will now add the three locations.
- 360° Photo 1 - Outside
Click (2) Normal
Select in the Windows File Explorer the file
present4D-Tutorial-1/1-Outside/Outside.jpgClick in the Windopresent4D-Tutorial-1 Open
- 360° Photo 2 - Body
Click (2) Normal
Select the file
present4D-Tutorial-1/2-Body/Body.jpgClick present4D-Tutorial-1
- 360° Photo 3 - Blood
Click (2) Normal
Select the file
present4D-Tutorial-1/3-Blood/Blood.jpgClick Open
Close the iMenu
Stop Editor Mode in the same way you have started it
3. Arrange the HotSpots
Prepare: Depending on your hardware read the chapter Moving HotSpots using VR Glasses or Using the Mouse to learn how to reposition the icons.
In this chapter you will also learn three possibilities to load the next Location.
- 360° Photo 1 - Outside
Move over the name
Outsideto select this rowClick on the arrow to the right of the location
Outsideto load this Location. The iMenu will close automatically.Move the HotSpot
Bodyto the window like visualized in 360° Photos with Icon Positions
- 360° Photo 2 - Body
Press Arrow Up Key on the keyboard to load the next Location
BodyMove the HotSpot
Bloodto the whiteboard like visualized in 360° Photos with Icon PositionsMove the HotSpot
Outsideto the window like visualized in 360° Photos with Icon Positions
- 360° Photo 3 - Blood
Stop Editor Mode in the same way you have started it
Click on the HotSpot
Bloodto load this locationMove the HotSpot
Bodybeside the body like visualized in 360° Photos with Icon Positions
Tip
present4D provides the HotSpot Target View Automation to handle the target views when you load an other Location by clicking an a HotSpot. By default it´s like walking through the site in real life: the viewing direction is always correctly oriented.

4. Import and Arrange the Slideshow Files
In this chapter you will also learn how to rename content.
Load Location 1
choose the tab Media
On the bottom row of the iMenu, there are buttons to add a Slideshow

- 360° Photo 1 Outside
Click (2) Slideshow
Select in the Windows File Explorer all photos of the folder
present4D-Tutorial-1/1-Outside/Bullet ReportClick in the Windows File Explorer Open
present4D-Tutorial-1The filename of the first file will be suggested as Slideshow name. Accept by clicking the green check mark.
Move over the name of your Slideshow to select this row
Click at the Pencil symbol to rename the Slideshow.
Press Ctrl + A to select the old entry and type
Bullet Report. Confirm by clicking the green check mark.Click (2) Slideshow
Select in the Windows File Explorer the video of the folder
present4D-Tutorial-1/1-Outside/Witness VideoClick in the Windows File Explorer Open
The filename will be suggested as Slideshow name. Accept by pressing enter on the keyboard or clicking the green check mark.
Close the iMenu
Move both Slideshows into the direction of the bullets like visualized in 360° Photos with Icon Positions
- 360° Photo 2 Body
Load Location 2
Click (2) Slideshow
Select in the Windows File Explorer the video of the folder
present4D-Tutorial-1/2-Body/Bullet DetailsClick in the Windows File Explorer Open
Accept the name by clicking the green check mark.
Close the iMenu
Move the Slideshow into the direction of the body like visualized in 360° Photos with Icon Positions
- 360° Photo 3 Blood
Load Location 3
Click (2) Slideshow
Select in the Windows File Explorer all files of the folder
present4D-Tutorial-1/3-Blood/Blood DetailsClick in the Windows File Explorer Open
Accept the name by clicking the green check mark.
Close the iMenu
Move the Slideshow into the direction of the blood on the white board like visualized in 360° Photos with Icon Positions
5. Set Start View settings
This icon sets the start view direction that is displayed when this location is loaded by using the iMenu, the Arrow Keys or the Number Keys on the keyboard.
Location 1: Move the icon into the direction of the bullets like visualized in 360° Photos with Icon Positions
Location 2: Move the icon into the direction of the body like visualized in 360° Photos with Icon Positions
Location 3: Move the icon into the direction of the white board with blood like visualized in 360° Photos with Icon Positions
Next Steps
You have finalized the first tutorial.
Next steps:
Distribute and Share the Project via cloud or cable
Using the Conference to discuss your project with others
Create a Quiz to extend the project into a learning environment
Quiz Example
Creating a Quiz
A quiz in present4D allows you to test the user’s understanding and collect feedback. In this tutorial, you will learn how to create a simple quiz about the color of the car.
Choose the Multimedia tab.
At the bottom, select Quiz.
Close the iMenu.
Click on the Gear symbol in the upper left next to the Quiz Infospot button.
Create an Info Page
Click on + Info to create a new information page.
Enter an appropriate headline and a description text for your quiz.
Create a Question Page
Click on + Question to create a new question page.
Enter the question “What color was the car?”.
Add the answer options:
Green
White
Blue
Mark “b) White” as the correct answer.
Create a Score Page
Click on + Score to create a score page.
Enter appropriate messages for different scores.
After you’ve set up your quiz, you can test it to make sure everything works as expected.
Video Tutorials
Visit our Youtube Tutorial Video Channel